My sister blogged about this, and I want it too! So many fun ideas already percolating in my mind...

Wednesday, August 25, 2010
Monday, August 16, 2010
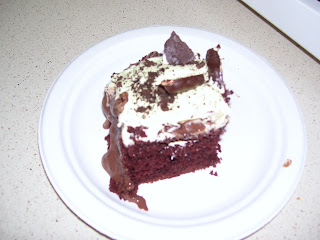
Chocolate Grasshopper Cake
One of my all time favorite flavor combinations is chocolate and mint. Thin mints, mint chocolate chip ice cream, peppermint bark, the list goes on and on. So when I saw this recipe on Betty Crocker, I knew I could make it better. And boy, did I!
Here's where I have to brag a little - I took the cupcake version of these to a bake sale for a church event, and they were a huge hit! I brought two plates (each plate only had 5 cupcakes, they were small plates), and they sold for a combined $45! One of the plates sold for $25, which was the second highest of any of the items sold. For five of these babies.
You start by making your basic chocolate cake, but add in a little peppermint extract. The recipe said to use store-bought hot fudge, but ganache is better, so I used that. Once the cake has cooled, spread a layer of ganache on top, then take some cool whip, dye it green, add a little mint extract to that, and spread on top of the ganache. I added some chopped up grasshopper cookies for decoration on top.
 After trying it this way, I noticed that the ganache I used wasn't quite thick enough, so the cool whip kept sliding off the top once you cut it into pieces. Rather than make thicker ganache (way too easy!), I decided to make them into cupcakes!
Here's where I have to brag a little - I took the cupcake version of these to a bake sale for a church event, and they were a huge hit! I brought two plates (each plate only had 5 cupcakes, they were small plates), and they sold for a combined $45! One of the plates sold for $25, which was the second highest of any of the items sold. For five of these babies.
You start by making your basic chocolate cake, but add in a little peppermint extract. The recipe said to use store-bought hot fudge, but ganache is better, so I used that. Once the cake has cooled, spread a layer of ganache on top, then take some cool whip, dye it green, add a little mint extract to that, and spread on top of the ganache. I added some chopped up grasshopper cookies for decoration on top.


Regrettably, I failed to take pictures. I may just have to make these again sometime soon and capture the pure delight of the cupcake version for you.
Here's the recipe:
Ingredients:
1 box chocolate cake mix
Ingredients as called for on box
2 tsp mint extract
1 (8 oz) container Cool Whip
1 pkg grasshopper cookies
Green food coloring
Combine ingredients for chocolate cake, as called for on box. Add 1 1/2 tsp mint extract to the batter, then bake as directed on box, in 9x13 pan.
Let cake cool completely, then frost with a layer of chocolate ganache. Allow to thicken in fridge for 15-20 minutes. While setting up, combine cool whip with remaining 1/2 tsp mint extract. Add green food coloring to desired green-ness. Spread a layer of mint cool whip over the ganache. Crush the grasshopper cookies, and sprinkle over cake.
A fun twist:
Make cake batter as above, but bake into cupcakes. Inject the ganache into the middle of the cupcake, then frost with cool whip and top with cookies.
I hope you enjoy these as much as I did!
Saturday, August 14, 2010
Holiday Wreaths
This past summer, my hubby and I celebrated our first anniversary. We have a little inside joke (based on the Disney movie Cars - no, we don't have any kids yet, we just like Disney movies, okay?), anytime we get snuggly together on the couch, we say we're "getting cozy at the cone." So, for our anniversary, I made him a little wooden sign:

I got a little wooden "welcome" sign at the dollar store, then just painted over it! This would have been a lot easier if I wasn't too poor to afford stencils. I had to print off "The Cone," then cut it out using an exacto knife, then try and use that as a stencil. Not so easy. And it didn't really work out that well, which is why it's outlined in a darker blue. The edges were kind of wonky, so I touched them up by outlining. Turned out fairly decent, considering the lack of stencils!
I've also been really into wreaths lately. I made one for Christmas last year, and liked how it turned out so much that I made another for 4th of July.
For this one I got one of those twine wreath bases, a bunch of dollar store flowers, and basically just stuck them in until it looked pretty. I added a bow at the bottom for a nice touch. If you don't like your wreaths this simple, you could add little stars or something. I'm happy with just the flowers though!

I'm quite proud of the bow.

By the way, I used a very advanced method for attaching the flowers to the base: hot glue!
Same concept here, but with a Christmas tree wreath. Also used hot glue.

You could make a wreath for just about any holiday, with whatever color flowers and ribbon match the decor for that season. I think I'll try my hands at an Autumn wreath in a few months.
Getting Started
I am a very busy woman. I spend most of my time at school, at work, or at home doing homework. However, every so often I get the urge to create something, and I've decided I'd like to share those things with all of you! I'll start off with some of the things I've made over the summer. I love crafting, but I really love to bake. It's my weakness. You see, I'm a bit of a perfectionist, and since I've grown up baking, I like to think I'm rather good at it. I love the satisfaction of putting together a recipe and having it turn out absolutely perfect. The rave reviews my husband almost always gives doesn't hurt either :)
And so, we may as well get started. I'm new at this craft/cooking blog thing (not that I haven't read more than my fare share of other peoples' craft and food blogs!), so just bare with me until I get the hang of it.
To start off, FOOD! Naturally!


And so, we may as well get started. I'm new at this craft/cooking blog thing (not that I haven't read more than my fare share of other peoples' craft and food blogs!), so just bare with me until I get the hang of it.
To start off, FOOD! Naturally!

Cake Ball Truffles
(From Bakerella)
1 box of your favorite cake mix (cook as directed on box for 13 X 9 cake)
1 can of your favorite frosting (16 oz.)
1 package chocolate bark (regular or white chocolate)
1 can of your favorite frosting (16 oz.)
1 package chocolate bark (regular or white chocolate)
For mine, I used boring white cake and boring white frosting.
1. After cake is cooked and cooled completely, crumble into large bowl.
2. Mix thoroughly with 1 can frosting (it may be easier to use fingers to mix together, but be warned it will get messy).
3. Roll mixture into quarter size balls and lay on cookie sheet (I used a mini cookie scoop, then rolled them a bit to get rid of the flat bottom).
4. Chill for several hours (You can speed this up by putting in the freezer).
5. Melt chocolate in microwave per directions on package.
6. Roll balls in chocolate and lay on wax paper until firm (Use a spoon to dip and roll in chocolate and then tap off extra).
I added sprinkles on some (do this right after dipping), and others I let set up, then drizzled more melted chocolate over them.
On the same plate, I also have Oreo Truffles (also from Bakerella). I liked these significantly more. Because they use cream cheese instead of frosting, they seem so much creamier and rich.

I know it's not the greatest picture, but I'm working with a point and shoot here. Kind of hard to get the short depth of field I was going for.
There's a little teaser for you, I'll post some more of the things I've made this summer before school starts up!
Subscribe to:
Posts (Atom)